Microsoft Azure DevOps
TAFPro Cloud Execution
Using the power and scalability of the cloud allows automation to deliver the promise of a scalable testing platform. Controlling and making this efficient is just as important to take advantage of the cloud scalability.
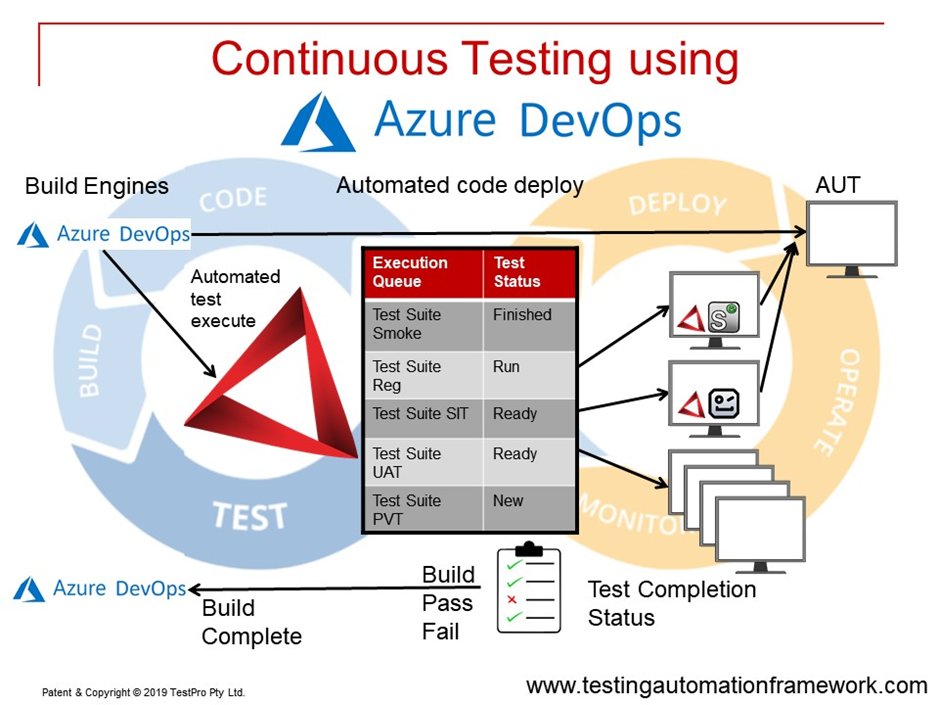
By using an advanced queuing system, TAFPro allows tests to be queued from testers, build engines or management tools ready to be executed. By scaling the cloud servers, more execution capacity can be added, allowing tests to be executed in parallel. Further, TAFPro allows build engines to trigger and report test completion so that a build engine can have multiple parallel tests being run, shortening the test cycles.
This format of testing is specifically suitable for continuous testing, agile delivery techniques and reduces the work for DevOp cycles.
TAFPro has been built to support the Azure DevOps Solution.
Azure DevOps Project Setup
Introduction
Introduction
This support section will explain basic Microsoft Azure Project setup and Git integration with Eclipse.
Log into Azure DevOps
- Goto the URL : https://aex.dev.azure.com
- Authenticate with your email address.
- Create a new Organisation.
- Create a new private project. This will allow you to add other team members later.
Create an Azure DevOps Project
You are now logged into Azure DevOps with your microsoft account – https://dev.azure.com/
Create a project by clicking the button:
![]()
Give the project a name. By default it will use a Git repo and the ‘Basic’ work item process.
Goto the project settings:
![]()
and turn on the Git Repos service for this project.
![]()
On the project main menu go to:
![]()
Scroll down to this section and intialize the Git repo with a ‘java’ .gitignore:

On the project main menu go to:

and choose:
![]()
Where is your code? Choose where you would like your Git repo to be hosted. This can be external or internal to DevOps, We choose the internally hosted Git service we just enabled and initialized:
![]()
Then select the Git repo you have just initialized from the list.
Choose a ‘Starter Pipeline’ with no existing YAML script.
Review your new default YAML build script. It is a simple demo script, so click:
![]()
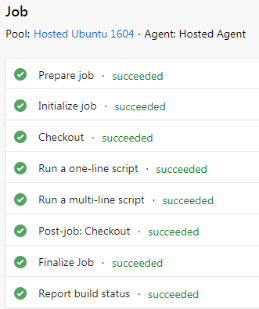
This will commit your demo YAML script into the Git Repo as ‘azure-pipelines.yml’, and send your build to an agent. The sample YAML script is effectively a ‘Hello world’ script that builds nothing but echos into the log, and demonstrates that the build process is working correctly.
Add Members to the DevOps Project
Adding members to the DevOps project means that they will be allowed to use the project and update the Git repo.
Add members by following from the project main menu:
Project Settings -> Teams
Click the team name and add members.
Git Integration with and IDE
Now that your Git repo has been created and configured you should clone the repo with your local Git client and begin creating the structure of the TAF Java project.
Azure DevOps Build Setup
DevOps Build Basics
Use the previously created Build Pipeline for your project. This will create a default build which can be seen as a YAML script file ‘azure-pipelines.yml’ in your Git repo. You can remove the demo build steps and start to replace them with the steps your project will need.
By default the build is triggered by changes to the ‘master’ branch. Pushing to this branch from Eclipse should cause a build to run.
Builds are not run on the Azure DevOps cloud server, they are sent out on a queue to be built by build servers. By default your build is sent to an ‘ubuntu-latest’ based build server. As we are building a java project based on a referenced ANT ‘build.xml’, a standard ubuntu based java ANT build is fine. See later in this guide about exporting the eclipse ‘build.xml’ into your repo.
By default the build output, typically the construction of bin\*.class files that match your src\*.java files is written back into the repository and a commit is created.
The azure-pipelines.yml File
When taken together these YAML script parts come together to be the one build script for the project. I recommend leaving it to DevOps to generate the YAML script parts and not to edit the YAML directly.
# Ant
# Build your Java projects and run tests with Apache Ant.
# Add steps that save build artifacts and more:
# https://docs.microsoft.com/azure/devops/pipelines/languages/java

trigger:
- master

pool:
    vmImage: 'ubuntu-latest'
Figure 1 – Typical Ant YAML script header
Note that the build script itself is a YAML file ‘azure-pipelines.yml’ that is also stored in the Git repo. Edits to the pipeline that change the ‘azure-pipelines.yml’ will also result in a Git commit.
Note that back on your DEV workstation using eclipse, you will have to pull all these changes back to your local repo BEFORE you can push any test changes.
Configure ANT Build
When you build and test your project successfully in Eclipse you must export the ‘build.xml’ file that contains all the project build dependencies. The ‘build.xml’ is usually created under the eclipse project folder so add this to the path. Sync the ‘build.xml’ file into the Git repo so that it will be available to DevOps.
- task: Ant@1
    inputs:
    workingDirectory: ''
    buildFile: '/build.xml'
    javaHomeOption: 'JDKVersion'
    jdkVersionOption: '1.8'
    jdkArchitectureOption: 'x64'
    publishJUnitResults: false
    testResultsFiles: '**/TEST-*.xml'
Figure 2 – Ant task YAML sample
Configure “drop” Publication
After a successful build the build result needs to be “published” so that it will be retained in DevOps and not discarded. The build is given a name, typically ‘drop’ and automatically versioned.
- task: PublishPipelineArtifact@1
  inputs:
  targetPath: '$(Pipeline.Workspace)'
  artifact: 'drop'
Figure 3 – PublishPipelineArtifact task YAML sample
SSH EndPoint
Create SSH EndPoint
One of the following release steps uses the SSH secure file copy task. To use this, you must first define an SSH EndPoint. Follow these steps steps to create one. From the project main menu go to:
Project settings -> Service connections -> New service connection
- Choose the service connection type of ‘SSH’
- Give the service connection a name
- The host is the name (or IP) of the server hosting the TAF Agent file share, and the SSH service that this will connect to
- The port is always 22 (std for SSH)
- The username and password should be the username and password of the owner of the SSH service on the file share server. We recommend using username and password security as the public/private key mechanism can be very problematic to set up
Azure DevOps Release Setup
Create a Release
On the Azure project main menu follow:
Pipelines -> Releases -> New -> New release pipeline
Give the release a name. On the ‘Select a template’ select ‘Empty job’.
Stages
We will create a release pipeline that requires only a single stage.
Add an Artifact
Go back to the Release pipeline.
On the Artifact panel select ‘+ Add an Artifact’
Choose the (this) project, the source build pipeline and choose ‘latest’.
Add Release Tasks
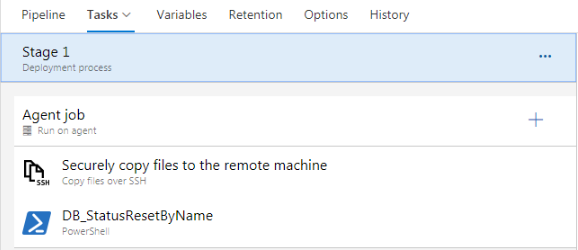
On the Release Pipeline horizontal menu select the Tasks tab for Stage 1.
By default we will be sending release tasks to the release agent queue. ‘Agent job’ should already be available.
Click ‘+’ to add a task to the ‘Agent job’.
- The first task to add to the job is the ‘Copy files over SSH’ task. This task will copy the as-built versioned ‘drop’ to the common file share used by TAF Agents to source test projects
- The second task is a PowerShell task that calls a stored procedure in the tafdb to put this test job onto the TAF Agent batch queue
Create Pipeline Variables
In each of the steps below you will see that a number of variables are defined. The variable named ‘releaseDeployFolder’ will be used in a YAML script using the variable substitution syntax $(releaseDeployFolder).
On the pipeline tabs bar for this stage find the Variables TAB. Create a variable for each variable used in the following tasks. Give each variable the value suggested in the sample task. Make sure to ‘Lock’ the password variable to conceal its value.
Task 1: Securely copy files to the remote machine
This step uses the DevOps SSH secure file copy mechanism. The SSH Secure EndPoint must be set up before this step can be used.
variables:
  releaseDeployFolder: 'C:\_drop'

steps:
- task: CopyFilesOverSSH@0
  displayName: 'Securely copy files to the remote machine'
  inputs:
      sshEndpoint: 'TAF_AZURE_SERVER'
      sourceFolder: '$(System.DefaultWorkingDirectory)/_Taf_azure_autoitx3/drop/s'
      targetFolder: '$(releaseDeployFolder)\$(Build.DefinitionName)\$(Build.BuildNumber)'
Figure 4 – The CopyFilesOverSSH task sample
Task 2: DB_StatusResetByName
variables:
    TAFDatabaseServer: '13.70.120.44'
    TAFSQL_User: 'tafuser2'
    TAFSQL_UserPassword: '********'
    TAFDB_Name: 'tafdb'
    TAF_Environment: 'autoit_test'
    TAF_Env_Username: 'tester1'

steps:
- powershell: 'Invoke-Sqlcmd -ServerInstance $(TAFDatabaseServer) -Username $(TAFSQL_User) -Password $(TAFSQL_UserPassword) -Database $(TAFDB_Name) -Query "EXEC tafshema.StatusResetByName $(TAF_Environment), $(TAF_Env_Username), ''$(Build.DefinitionName)\$(Build.BuildNumber)''"'
displayName: 'DB_StatusResetByName '
Figure 5 – The PowerShell task sample
The release is now setup and can be triggered to see the test run on a TAF Agent.