DevOps Git in Eclipse
Introduction
The primary interface between your development environmemt, such as Eclipse, and the Microsoft Azure DevOps environment is the Git source code control system. Azure DevOps will work with many Git hosting styles, in this example we will use the Azure DevOps built-in Git repsoitory established in the section Microsoft Azure DevOps.
Cloning a Git Repo for use in Eclipse
Discover the URI of the Repo from Azure DevOps
Select the main menu item ‘Repos’ from the DevOps project. Click the ‘Clone’ task on the top right of the Repo screen:
![]()
The Clone options appear:
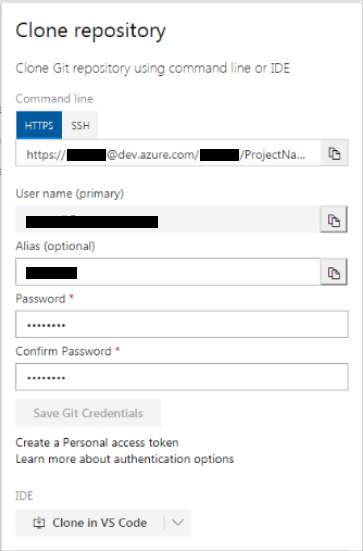
The internet URI of the repo is:
https://<username>@dev.azure.com/<username>/<projectname>/_git/<projectname>
Alias Authentication
For use with the Eclipse eGit client I recommend the use of the Alias Authentication feature. This will allow the Git repo to be accessed by any of the DevOps authorised users as it does not involve the default repo URI that is specific to the creating user. The PAT (Personal Access Token) feature of Azure DevOps Git does not work with the current version of eGit at the time of writing.
Give your alias a name – that is NOT the same as your username.
Create a password – it has some complexity rules so choosing to use the generated password is OK. Note that in a later step this alias and password will be used as part of the Git repo URI.
The new form of the Git repo URI with Alias will then be:
https://<alias>:<password>@dev.azure.com/...
*** NOTE: DO NOT USE SPECIAL CHARACTERS IN THE ALIAS PASSWORD
BE AWARE that a password that contains special characters for URIs will not work when used as part of an in-line Alias authentication. Change any special characters in the generated password to letters or numbers.
A password like ‘bA9aXcyUPYKaXcp’ is fine. You will not have to remember it once it is configured into the Git client.
*** IMPORTANT: Save a copy of the URI, the alias and password by pasting them into a notepad. You will need this later to configure eGit.
Cloning the Repo
In Eclipse follow the menus:
Window -> Show View -> Other... -> Git Repository
In the Git Repository screen, run the mouse over the menu icons until you find ‘Clone a Git Repo …’
In your notepad, take the URI of the Azure DevOps repo and edit it to contain the
From:
https://<username>@dev.azure.com/...

To:
https://<alias>:<password>@dev.azure.com/...
Paste this new Alias URI into the URI field. The other fields on the screen will be populated automatically.
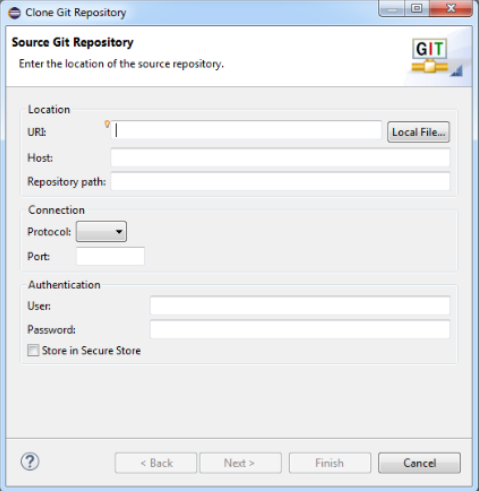
Click ‘Next >’
On the next screen the ‘Master’ branch should already be selected as the default.
Click ‘Next >’
Choose a directory where your local Git repo clone will live.
*** NOTE: DO NOT CHOOSE your local c:\Users\<username> folder even though it is suggested as the default !!!
The TAF Agent will have a permission issues with projects hosted under c:\Users
Instead choose a generic path such as C:\git for your repo.
Click ‘Finish’.
When the clone operation has finished the repo will appear in the Git Repository view in Eclipse.
Set Up an Eclipse Java Project in your Local Repo
Set up the Project in Eclipse
In Eclipse follow the menu:
File -> New -> Java Project
Give the Java project a name, and unselect the use of default location. We want to have our new Eclipse Java project created INSIDE the new local repo.
Choose the path for the project folder to be under c:\git\<projectname>. This is the path of the matching repo. Eclipse will create a Java project inside the repo.
The project will now show up in the ‘Package Explorer’ and ‘Navigator’ views.
Copy the TAF jars from the TAF installation folder to your project lib folder.
From:
C:\Program Files (x86)\TestPro\TestPro Automation Framework\lib

To:
C:\git\<projectname>\<javaproject>\lib
Copy any other jars from selenium, AutoIt3, Jabob or autoit4java to your java project lib. Commit these jars into the repo and push them.
Configure eGit for PUSH and PULL
In Eclipse, right click the project in the ‘Package Explorer’ and ‘Navigator’ views.
Follow the menu:
Team -> Remote -> Configure Push to Upstream...
On this screen you will ‘Configure Push’
To the right of the repo URI click the ‘Change’ button.
This screen looks similar to the screen you used to create the local repo in the clone process.
Paste the same URI you used to clone the repo. It should include the full
The other fields should populate automatically after pasting the new alias URI.
Click ‘Finish’.
Now the repo Push URI has been configured to use Alias authentication, click ‘Save’.
Follow the menu: Team -> Remote -> Configure Pull from Upstream…
Note that the saved repo URI and the configuration of Alias authentication is being used.
The eGit Push and Pull functions are now configured.
Prepare Git Staging and Commits
In Eclipse follow the menus:
Window -> Show View -> Other... -> Git Staging
This will show the Git Staging view. When changes and edits are detected in the local repo the changes are listed in this view as ‘Unstaged Changes’. Stage the changes using the ‘+’ or ‘++’ buttons. Then when you are happy with the contents, give the commit a comment and create it with the ‘Commit’ button. I do not recommend using ‘Commit and Push’.
![]()
Use Team -> Push Branch ‘Master’… to see the ‘Push to branch in remote’ screen. Then use ‘Preview’ followed by ‘Push’. This way of pushing will use your saved Alias authentication credentials.
***NOTE: Like any Git repository system you must pull all remote commits and merge them before pushing your local commits up to the remote. Use the Push, Pull, Merge and Rebase Git functions as you would using any other Git client.
For further documentation on the Eclipse eGit client please goto:
https://www.eclipse.org/egit/
Create a TAF Java Test System
Follow the instructions in the TAF Guides to create a TAF test system as the Eclipse java project. There are instruction on the use of JUnit, selenium and AutoIt3.
There are instruction on the use of the TAF Build Path and the Eclipse Java Build Path to ensure that the jars required by the various tools sets employed in your tests are being referenced correctly. To support the DevOps remote build process you must include copies (not external references) of the required jars inside the eclipse java project and as a result, inside the Git repo. This will ensure that all the required jars will be present at the time the DevOps build runs.
Modify the Standard .gitignore
In order to have 3rd party jars included in the repo, the .gitignore must have the *.jar specification removed.
Export the build.xml
Make sure that your Eclipse Java project builds successfully, and that the Eclipse Java Build Path has been configured properly.
In Eclipse follow the menu:
File -> Export -> General -> Ant Buildfiles
Click ‘Next >’
Choose the Eclipse project to export.
Click ‘Finish’
The ‘build.xml’ file is created or updated in the project folder.
This change will create an entry in the Git Staging view and, when appropriate, must be included into a commit and pushed to the remote Git repo. This is the ‘build.xml’ that is referenced by the ANT build step. Include the Eclipse project folder name in the location of the ‘build.xml’ file to reference it correctly.